JiTest User Manual
for JiTest Fawjn v2.1
![]()
(v 2.1.0, 170301)
Index
- Overview of JiTest’s issue types
- How to work with JiTest
- JiTest issues
- JiTestsuite issues
- JiTestplan issues
- JiTestExecution issues
- JiTestReport issues
- States of steps/executions/reports
- Cloning/Moving JiTest Issues
- Dashboard charts
- Linking JiTest with requirements
- Test roles in JiTest
- JiTest specific issue links
Overview
JiTest introduces a set of new test specific issue types to JIRA
![]() JiTest is the issue type you should use to define your test cases
JiTest is the issue type you should use to define your test cases
![]() JiTestsuite is the issue type that allows to group your test cases into groups and define a logical structure
JiTestsuite is the issue type that allows to group your test cases into groups and define a logical structure
![]() JiTestplan allows you to define a set of test case or suites that should be executed in a test run together
JiTestplan allows you to define a set of test case or suites that should be executed in a test run together
![]() JiTestexecution stores the results of running a test case within the execution of a specific test plan.
JiTestexecution stores the results of running a test case within the execution of a specific test plan.
![]() JiTestreports are created when a test plan gets executed at a specific point in time and contains references to all execution issues.
JiTestreports are created when a test plan gets executed at a specific point in time and contains references to all execution issues.
How to work with JiTest
The ISTQB or the planned / structured approach
Well the first thing to create are test cases (![]() JiTest). After you have created a few of them it might become handy to organize them logically into test suites (
JiTest). After you have created a few of them it might become handy to organize them logically into test suites (![]() JiTestsuite). Be aware we are not talking about grouping them for execution but for logical aspects such as features, functional/nonfunctional, regression,….
JiTestsuite). Be aware we are not talking about grouping them for execution but for logical aspects such as features, functional/nonfunctional, regression,….
Besides grouping you can also use the JiTRequirement input field to link test cases and/or plans to user stories and use a Scrum or Kanbaan board to link them to epics.

How to work with JiTest – Create test cases

If you want to execute tests (AKA run them) you need to create a test plan and add test cases or test suites to the plan, that should be executed together in a test run. From the test plan you can execute test runs by clicking on the execute button (see right picture). This will automatically create a test report issue (![]() JiTestreport) and for each test case found in the test plan one test execution issue (
JiTestreport) and for each test case found in the test plan one test execution issue (![]() JiTestexecution).
JiTestexecution).
 Now when performing manual tests you need to open the test execution issue that belongs to the test report and has the specific test case as parent. You can then set the execution state of the test case steps by editing the steps table in the test executions. There you can set the state of each executed step of a test case. The test report will automatically adjust to the new states you entered on its execution issues and will update its overall status / details list and pie chart.

How to work with JiTest – Full workflow
Please mind that you should NOT create test report or test execution issues manually. They should be only created by the execute plan button to ensure the linking between test execution, test report, test case and test plan issues is correct.
Explorartory mode extensions
While to follow the ISTQB testing approach is a good idea, sometimes real life overrules and situations might occur where:
- You have to update a test step while executing it, because you realize it’s a little bit different scenario to what has been assumed while specifying the steps.
- You need to perform additional new tests in an already started test report.
- You need to simply perform one single test case to retest a specific bug that was reported without having to create a new test plan and report each time.
No need to panic, JiTest offers these features in so called exploratory mode. When enabled by clicking on the exploratory mode button in the execution panel, the first column gets write enabled (indicated by pale green background header) and the upload to test case button is activated (also highlighted with a green background), making you aware of this special mode.

Clicking on the update to test case button will first save the current version to the execution and will in a second step update the test case’s steps.
By clicking on the exploratory button again you can revert to read only mode.
To add new test cases added to the test plan after a test report has been created, you can now simply click the update from plan button available in reports panels to create new executions. This only affects NEWLY assigned test cases. Removals of test cases will not be reflected in this update request.

The third scenario is in our backlog and will be available with the next upcoming release Anacohenda, sheduled for mid of April.
 JiTest issues
JiTest issues are used to store the detailed description of a test case and how to perform it. Besides the general fields each JIRA issue has, the following additional field is available in the Details panel:
- JiTParentSuite stores a single reference to a suite issue, which is the parent suite for this test case or None

In addition two specific GUI sections are available for a JiTest issue:
- Test case steps table – this section allows you to specify specific test steps to be performed when executing this test case. Whether these are human readable instructions or code lines is up to the QA team’s decision.
- Executions list – this section shows for each test plan this test case is a part of the latest execution result and links to the plan, report and execution issues.
How to define test case steps
The test steps table has a nifty editor UI, supporting dragging rows (even multiple), inserting, deleting and even copy/pasting rows between different test case windows.
But step by step:
Basic steps definition
The steps table consists of three columns: The row index column, the step column and the comment column. The text input areas can be resized vertically for longer inputs using the resize handle in the bottom right of each text input area.

If part of the content of such a text input area is hidden, an additional icon to the left of the handle indicates hidden text.

By clicking on this scroll indicator the input area will be extended to ensure all text is visible.
Advanced steps/rows handling
The first or row index column can be right clicked to get access to the row pop-up menu allowing you a lot of goodies.
 Copy/Paste/Cut will perform operations based on the operating system’s clipboard, so if you want to you can copy the data (alas in JSON format) with ease to external applications. These operations will also work between different windows and even different browser instances / applications.
Due to operating system security concerns, pasting data into the table is sometimes not straight forward. While Internet Explorer will only pop-up a security/confirmation alert, Chrome and Firefox do not support pasting content directly. It is still possible with a little work around. So if you want to paste in Firefox or Chrome, select the paste entry from the pop up menu and afterwards paste the clipboard using the operating system shortcut (Ctrl + v) into the appearing pop-up text area (shown below):

After pasting the clipboard into the text area, the content will be automatically parsed and if valid will be inserted into the table.
Using Ctrl + C/V/X directly will only copy the text part selected inside the currently active text input area. To copy/paste/cut rows of the table you MUST use the table’s pop-up menu accessible via right mouse click on the row index column.
Using the Ctrl key allows you to select multiple rows. So if you want to insert e.g. 3 rows beneath the current row, make sure to first select three rows and then pop up the menu with the right mouse button. The numbers of rows to be inserted/deleted is indicated in the menu entries.

The row index column is also the drag handle, allowing you to drag rows (even multiple) within the table. It is NOT possible due to browser limitations to drag rows to another browser window. If you want to drag a row into first row position, drop it onto the header / label row.
When you are done with specifying / modifying the table do not forget to save the steps by clicking on the save button located top right of the table:

Copying steps from external sources (New in v1.7)
If you want to maintain your steps outside of JIRA, you may copy them directly into the table using the pop-up menu as outlined in the chapter above. For Excel you need to select an area of two columns and arbitrary rows which will be pasted into the steps table as steps and comment fields. If you experience error messages about wrong column count when importing make sure you did not try to import empty columns as Excel will not copy those to the system’s clipboard.
You may also copy native CSV test steps data but you need to make sure you are using TAB as field separator mimicking the Excel clipboard format. You may even copy Seleniet test files into the table. For this you need to make sure that the first line of the imported text starts with a “§” comment.
 JiTestsuite issues
JiTestsuite issues allow you to group test cases into logical suites. Suites can be nested so you can start with a set of smaller suites containing a few test cases and then group those to create larger suites.

Besides the general fields each JIRA issue has, the following additional field is available in the Details panel:
- JiTParentSuite stores a single reference to a suite issue, which is the parent suite for this suite or None
In addition a specific GUI section is available beneath the Details section, which show the children of the current suite. To keep load on the system lower only the direct (first) level of children is shown on displaying the issue initially. To see all test cases that are part of this suite (either directly or via child suites recursively) you can click on the “All Test cases” button.

Editing Children of a suite
To work on the tree of all children of this suite you can click on the edit button which opens up a pop-up that allows you to modify any node of the tree.

The pop up contains three areas:
- Children’s tree on the left side
- Select box to add test cases or suites that are not part of the tree yet
- Close button top right and Save button bottom right
Manipulating the children’s tree
When hovering over a node a trash bin appears which can be pressed to remove the child node from the tree. The test case or suite will NOT be deleted from the project. It will just be removed from the tree of this suite. Their JiTParentSuite field will be changed accordingly to reflect the tree removal.

By pressing Ctrl while clicking you may select multiple nodes which will be coloured with a light orange background to visualize the selected ones.

Dragging is supported ONLY for SINGLE nodes selected so you can move test cases and suites within the tree but only one by one. A green arrow indicates the place the dragged node would be moved to.

Adding new test cases / suites to the tree
Using the select box top right and the neighboring Add button you can add new test cases or suites to the tree. Newly added nodes will be placed at the first level as last element. So the node will be shown as last/bottom entry.

Saving the modifications
By clicking on save, JiTest will parse the new tree and adapt / change all JiTParentSuite fields of all nodes (the added ones, the moved ones, the removed ones) to match the tree in its current state. If you want to cancel your changes you can safely click on the close button top right. As long as you do not press save the modifications are only local and have not been stored to the JiTest database.
 JiTestplan issues
JiTestplan issues allow you to group test cases for execution. Plans can contain test cases and suites (for later all test cases being child of the suite will be added to the test plan). It is not possible to specify the test execution order when including test cases via their parent suites within the test plan issue. If you want to order test cases specifically you will need to add test cases directly. Test plan issues will only remember the execution order of the first level.

Test plans need to be assigned to one or more versions. To execute them you must choose from ONE specific version, the created test report will then refer to.

Beneath the Details section a specific GUI section is available, which shows the children and all test cases of the plan. To keep load on the system lower only the direct (first) level of children is shown on displaying the issue initially. To see all test cases that are part of this plan (either directly or via child suites recursively) you can click on the “All Test cases” button.

Beneath this list of children a table shows all reports showing the results of executions of this plan.
To execute a plan just press the Execute button.

This will create a JiTestreport issue and for each test case an execution issue. Where the first one is used to report the overall results of the execution, each execution issue stores the result of each specific test case execution.
The table shows the state of all executions in a colored bar. The following colors are used to signal specific execution results.
Work in progress is a state where no final decision about failure or success can be taken.
Blocked is to be used if a test case or step can not be performed due to earlier failures.
 JiTestexecution issues
DO NOT CREATE THIS ISSUE MANUALLY, but only via the Test plan’s execute plan button
JiTestexecution issues store the execution of a specific test case within a specific test report instance. Each test case consists of a set of steps that can have different states.

Besides the general fields each JIRA issue has, the following additional field is available in the Details panel:
- JiExecDuration which stores the duration the test execution for the “parent” test case took. You may supply values in seconds (e.g. 111s), minutes (2m) or mixed values (2m 30s).
Beneath a specific GUI section is available, which shows the overall state of the execution for the test case and an editable steps table, where you can set the state for each step and add comments to them. It is on purpose NOT possible to modify the steps column itself.
In addition there are also links to the parent test case and test report this execution issue belongs to and a Report bug button, that allows you to quickly create a bug ticket if you find a failure while testing manually.

(New in v1.7)
When performing manual tests the execution state table provides keyboard shortcuts to ease setting the state of a step. In order to be triggered the corresponding Comment field must have the input focus. By pressing ALTGR + first letter of state the step will be assigned the corresponding execution state and the focus will be moved to the comment field of the next step. By pressing SHIFT + ALTGR + first letter of state you can traverse back/upwards. So an optimum workflow is to enter any comment about the step executed followed by pressing ALTRG + the first letter of state (any of N,P,F,B,W). And voila you may comment the next step.
 JiTestreport issues
DO NOT CREATE THIS ISSUE MANUALLY, but only via the Test plan’s execute plan button
JiTestreport issues gather all information of an execution of a test plan for a specific version. The results are visualized as table and pie chart inline in the issue.

The report data can be easily exported into XML, HTML and Excel via the Export report button top right.

The HTML version is a single page HTML that can be sent via mail to interested recipient (as you could also do with the Excel report file).
States of steps/executions/reports
States of steps are aggregated to an overall state for the execution, as well as all executions’ states will be aggregated to the overall state of the report.
The rules for the aggregation are applied in the given order:
- Overall state is set to “Not executed”
- If there is any step “Work in progress”, overall state is changed to “Work in progress”
- If there is any step “Failed”, overall state is changed to “Failed”
- If there is any step “Blocked”, overall state is changed to “Blocked”
- If all steps are “Passed”, overall state is changed to “Passed”
Cloning / Moving JiTest Issues
As of now cloning is only supported under specific situations / for specific issue types of JiTest.
You may clone:
- JiTest test case issues which will be added to the same parent suite (if defined) with a cloned link to the original JiTest test case issue. The cloned instance will have no executions linked to it
- JiTestplan issues which will copy the children from the original plan and will get a cloned link to the original plan. The cloned instance will have no reports linked to it
Suites, reports and executions can not be cloned.
As JiTest uses quite a number of internal custom fields to keep the different issues in sync it is currently not possible to move any JiTest issue type. Future versions might introduce support for moving and cloning additional types.
Creating dashboard charts
JiTest provides / embeds a fork of the famous Barcharts for JIRA plugin provided by TNG tech. The fork provides extensions like pie chart and time line charts as well as advanced exporting of data. The rendering is based on the Flot library allowing to draw the charts client side without the need to create static images on the server-side.
Supported Charts in JiTest are:
- Normal bar charts
- Stacked bar charts
- Pie charts
- Timeline charts (daily basis)
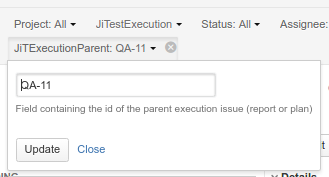
All of these charts normally work on the basis of a set/list of execution issues, which must be saved as a custom filter first. So if for example you want to show a chart about the test report QA-11, you need to filter all executions for a JiExecutionParent matching QA-11


and save this as custom search.
Now switch to your dashboard (or create one first) and add the JiTest chart gadget (you can filter by entering jitest in the top right field):

After closing this pop-up you’ll notice a configuration dialog that has been added to your dashboard:

This is where you configure your chart. In the first field you need to specify a saved search result. The field supports auto complete. Again as most of the graphics/charts needed for test result visualization make sure your searches are returning a list of executions.
After specifying the filter you need to choose a type of chart you want to display. For timeline based charts you need to select an appropriate field in the domain axis select box below (any date based field will be fine)
If you want to display charts over test cases you need to choose JitParentTestcase as domain axis field.


If you want to display charts over reports you will need to choose JiTExecutionParent.


For pie charts of a test report make sure your custom search contains executions of only ONE single report, else the pie chart will not be drawn. An example of a valid configuration for a pie chart is shown below:


Linking JiTest with requirements
 When using JiTest with JIRA Agile you can make use of epics and stories. You can link test cases and test plans to epics and stories the following way:
- For Stories JiTest has added a custom field called JiTRequirement which is a single issue picker field that allows you to link a test case or plan to an existing user story issue.
- Linking to epics is a little bit more complex as the custom field linking issues to epics is not initially visible being an internal JIRA field. Thus the best way to link test cases and plans to epics is via the top navigation, creating a SCRUM board and assigning the test cases and plans to the respective epics there. After this initial assignment you may reassign / change / delete the assignment directly via the now visible custom field
Please note that each epic and user story have a JiTest panel / Section where all assigned test cases and plans and their test results are shown.

How test executions are linked to requirements
When executing a plan, the report will own the requirement link from its parent test plan. Each execution will own it’s requirement link from it’s parent test case and if the test case has no requirement linked, will copy the plan’s requirement link.
- Testplan → Testreport
- Testcase → Testexecution
- or if the test case has no requirement link: Testplan → Testexecution
Test roles in JiTest
Based upon basic roles from the ISTQB test roles JiTest supports the following test roles:
Tester

The tester is a team member whose responsibility is to define test steps of roughly defined test cases and to perform test executions of test reports.
If detected the tester can report bugs via the report bug button or by creating a bug ticket manually (like all project members can)
The tester is not responsible for logically grouping test cases into suites, assigning them to requirements or adding them to test plans for planned executions.
These activities are in the responsibility of the next two test roles.
The tester has no write access to: JitParentSuite, JiTRequirement, Fix Version, Edit Suite, Edit Plan, Execute Plan
Test analyst

The test analyst takes care of analyzing the requirement specification, preparing together with the test manager a test concept paper outlining how to tackle the test activities necessary to verify conformance of the produced code with the given specification. After the concept phase he is roughly defining test cases for the given requirements. He may also group them into logical groups (test suites). Please also note that suites can have child suites allowing create many levels of grouping. After roughly defining the test cases he will hand over those defined test cases to the tester.
The test analyst is not responsible for creating and maintaining the test plans or for triggering the execution of a test plan (via the Execute button on the test plan panel). These are the tasks of the test manager role.
The test analyst has no write access to: JitParentSuite, JiTRequirement, Fix Version of test plans, reports or executions, Edit Plan, Execute Plan
Test manager
 The test manager or test leader is responsible for leading the test team and providing the strategy and tactics of how to perform all necessary QA tasks in the project. He is kind of project manager for all test activities and as such will together with the help of test analysts write down a concept paper and will create and maintain test plans verifying specific aspects of the given specification. He is also responsible for resource disposal and as such is the only role to trigger the execution of test plans by pressing the Execute button on the test plan’s panel. The Execute button will create a test report and test executions to be processed by the testers in the team.
The test manager has write access to all fields besides the JiTRequirement of reports and test executions, as these issue types are kind of snapshots of the test plan and their assignment to the given requirement must not be modified once they are scheduled for execution.
How to activate JiTest test roles
In order to activate these role model and it’s restrictions on write access to JiTest relevant data, please ask you admin to create the three user groups:
- jitest-tester
- jitest-analyst and
- jitest-manager
Do not forget to also assign the project members to their respective roles.
JiTest specific issue links
JiTest introduces a set of new link types to your JIRA projects. Notably the following two new types:
- failed in / reported in: When reporting a bug this link type is used to link the bug to the parent test case of the report and the execution the bug was detected in.
- retested in / retesting: if a report’s executions do not all pass, a retest needs to be performed. When clicking the retest button in the report panel, a new report is created only containing executions for those test cases that didn’t pass. The new report is linked to the original report via this link type.